


Adding images to your content
When adding an image to your content, there are two methods of adding an image from the Media Library. This depends on the content type.
Please always consult the Image sizes for each content type page for the correct image size to use for the content type you are using.
Via an image field in the content type
Most content types will have a dedicated Image field. For these content types you just need to click the Select media button. See example below for the 2 column general content block. This will take you to the Media Library where you can search for an existing image or upload a new image.

There is a tutorial on adding an image using the Select media button in lesson 7 of the T4 Site Manager (version 8) Image Management course.
Via the text editor
This is the method you will use to add images to content types that use the text editor. This includes general content, accordions and tabs.
To add an image in the text editor, place you cursor where you want the image to appear and click the Insert file link or image button as shown in the screenshot below. For these content types you can use any of the standard image sizes. This will take you to the Media Library where you can or search for an existing image or upload a new image.
Important: When adding an image to the text editor, you must use the 'Select with layout' option for the image. There is a tutorial on this in lesson 8 of the T4 Site Manager (version 8) Image Management course.
Searching for images in the Media Library
Please note: If you use the main search box in the Media Library (shown below), then the select with layout option will not be available. If you are looking for a certain image, you should instead select the correct image folder and then use the Filter box, as indicated below.
Adding a caption to your image
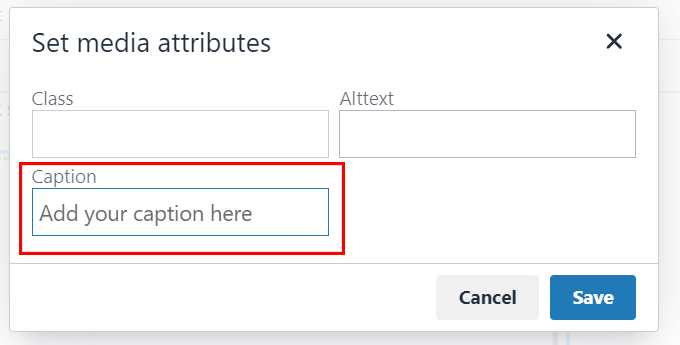
If you have selected one of the three caption image layouts via the 'Select with layout' option. Then the image will be added to the text editor with a blank caption. To add a caption, double-click on the image and enter your caption in the Caption text box.
Changing the alignment of the image
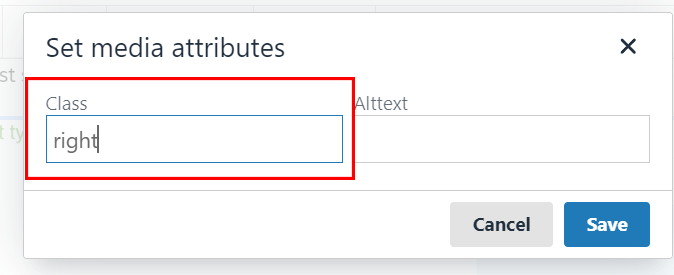 By default when you use any of the one-third or two thirds image sizes, the images will align to the left of your text. To change this to right-aligned, double-click on the image and enter 'right' in the Class text box and click Ok.
There is also a tutorial on how to change the alignment of an image in chapter 10 of the T4 Image management training course.